int rowIndex = 1;
for (int i = 0; i < dinerList.size(); i++) {
rowIndex += dinerList.get(i).orderList.size();
}
mainTable.addView(row1, rowIndex);
x = x + 5
x += 5
x += 1
x ++
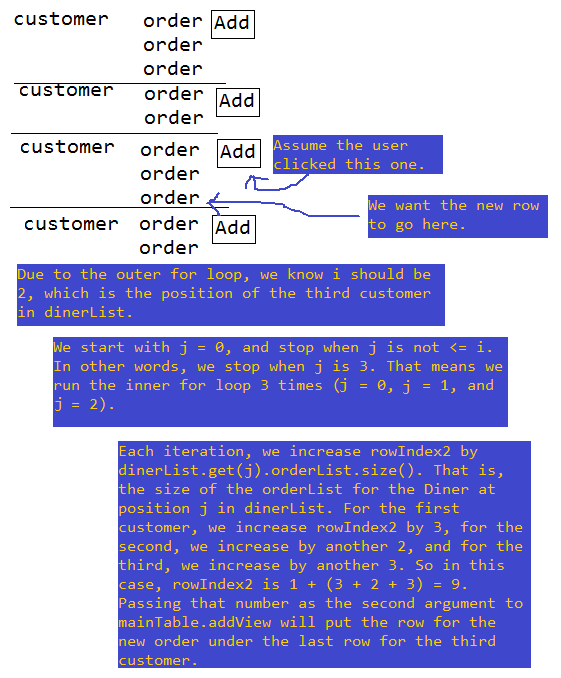
int rowIndex2 = 1;
for (int j = 0; j <= i; j++) {
rowIndex2 += dinerList.get(j).orderList.size();
}
mainTable.addView(row3, rowIndex2);
package glaukon.tutorials.tipcalc;
//Import statements let us use code that's not in our project's package.
import java.util.ArrayList;
import android.app.Activity;
import android.os.Bundle;
import android.view.Menu;
import android.view.View;
import android.view.View.OnClickListener;
import android.view.View.OnFocusChangeListener;
import android.widget.EditText;
import android.widget.ImageButton;
import android.widget.TableLayout;
import android.widget.TableRow;
import android.widget.TextView;
//MainActivity inherits from the Activity class, but also from the OnClickListener and OnFocusChangeListener interfaces.
public class MainActivity extends Activity implements OnClickListener, OnFocusChangeListener {
//Variable declarations go here.
private TableLayout mainTable;
private ImageButton addDinerButton;
private EditText firstCustomer;
private EditText amount1of1;
private ImageButton addButton1;
private TextView textSplit1;
private TextView textSplit1Dollar;
private ArrayList<Diner> dinerList;
//Replace the onCreate method we inherited from Activity with our own code using @Override.
@Override
protected void onCreate(Bundle savedInstanceState) {
//First, run Activity's version of onCreate.
super.onCreate(savedInstanceState);
//Inflate the UI using activity_mail.xml in the layout folder.
setContentView(R.layout.activity_main);
//Retrieve all the Views we need from our UI using findViewById and assign them to variables we declared earlier.
mainTable = (TableLayout) findViewById(R.id.mainTable);
addDinerButton = (ImageButton) findViewById(R.id.addDinerButton);
firstCustomer = (EditText) findViewById(R.id.firstCustomer);
amount1of1 = (EditText) findViewById(R.id.amount1of1);
addButton1 = (ImageButton) findViewById(R.id.addButton1);
textSplit1 = (TextView) findViewById(R.id.textSplit1);
textSplit1Dollar = (TextView) findViewById(R.id.textSplit1Dollar);
//Make a new ArrayList called dinerList, then make the first Diner using the Views from our UI, then add that Diner to dinerList.
dinerList = new ArrayList<Diner>();
Diner diner = new Diner(firstCustomer, amount1of1, addButton1,
textSplit1, textSplit1Dollar);
dinerList.add(diner);
//Set up listeners.
firstCustomer.setOnFocusChangeListener(this);
addDinerButton.setOnClickListener(this);
addButton1.setOnClickListener(this);
}
//Replace the onCreateOptiosnMenu method we inherited from Activity with our own code using @Override.
@Override
public boolean onCreateOptionsMenu(Menu menu) {
//Inflate the options menu using activity_main.xml in the menu folder.
getMenuInflater().inflate(R.menu.activity_main, menu);
return true;
}
//Implement the onClick method of OnClickListener.
@Override
public void onClick(View v) {
//If it's addDinerButton that was clicked, do this.
if (v == addDinerButton) {
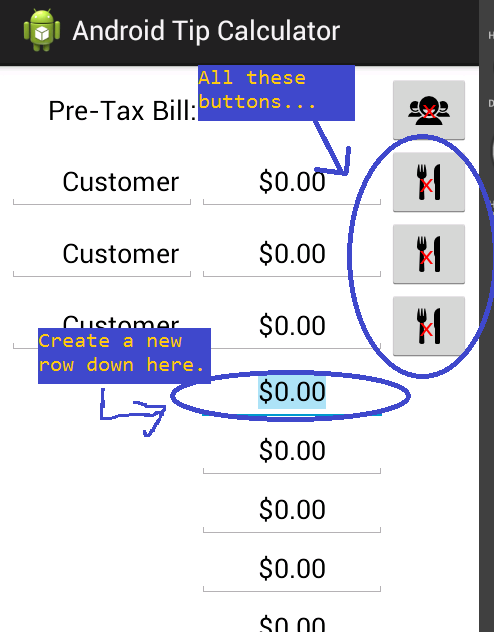
//Create a 2 TableRows, 2 EditTexts, 1 ImageButton, and 2 TextViews. Set their attributes based on inflated Views from the UI.
TableRow row1 = new TableRow(this);
EditText et1 = new EditText(this);
et1.setText("Customer");
et1.setSelectAllOnFocus(true);
et1.setInputType(firstCustomer.getInputType());
et1.setGravity(firstCustomer.getGravity());
et1.setLayoutParams(firstCustomer.getLayoutParams());
et1.setWidth(firstCustomer.getWidth());
et1.setOnFocusChangeListener(this);
EditText et2 = new EditText(this);
et2.setText("$0.00");
et2.setSelectAllOnFocus(true);
et2.setInputType(amount1of1.getInputType());
et2.setGravity(amount1of1.getGravity());
et2.setLayoutParams(amount1of1.getLayoutParams());
et2.setWidth(amount1of1.getWidth());
//Make sure the order EditText gets selected automatically.
et2.requestFocus();
ImageButton ib = new ImageButton(this);
ib.setImageResource(R.drawable.additem);
//Remember to set the listener.ib.setOnClickListener(this);
//Add Views to rows, then add rows to mainTable. Use a for loop to get the right row numbers to insert rows at. Make sure to account for every order of every Diner.
row1.addView(et1);
row1.addView(et2);
row1.addView(ib);
int rowIndex = 1;
for (int i = 0; i < dinerList.size(); i++) {
rowIndex += dinerList.get(i).orderList.size();
}
mainTable.addView(row1, rowIndex);
TableRow row2 = new TableRow(this);
TextView tv1 = new TextView(this);
tv1.setText(et1.getText().toString());
tv1.setGravity(textSplit1.getGravity());
TextView tv2 = new TextView(this);
tv2.setText(et2.getText().toString());
tv2.setGravity(textSplit1Dollar.getGravity());
row2.addView(tv1);
row2.addView(tv2);
//Add 11 static rows to rowIndex, as well as one row for each Diner in the bill splitting portion of app.
mainTable.addView(row2, rowIndex + 11 + dinerList.size());
//Make a new Diner and add it to dinerList.
Diner diner = new Diner(et1, et2, ib, tv1, tv2);
dinerList.add(diner);
//If it's not addDinerButton, do this.
} else {
//Use a for loop to run though all of dinerList, and if any one of their ibAddOrder ImageButtons were clicked, do this.
for (int i = 0; i < dinerList.size(); i++) {
if (v == dinerList.get(i).ibAddOrder) {
//Create a row, then 2 EditTexts. The first is a dummy one used to push the second one into the second column. Again, grab attributes from Views inflated by XML.
TableRow row3 = new TableRow(this);
EditText emptyEditText = new EditText(this);
emptyEditText.setVisibility(4);
EditText newOrder = new EditText(this);
newOrder.setText("$0.00");
newOrder.setSelectAllOnFocus(true);
newOrder.setInputType(amount1of1.getInputType());
newOrder.setGravity(amount1of1.getGravity());
newOrder.setLayoutParams(amount1of1.getLayoutParams());
newOrder.setWidth(amount1of1.getWidth());
newOrder.requestFocus();
row3.addView(emptyEditText);
row3.addView(newOrder);
//For loop again to get the right row number to insert the row at.
int rowIndex2 = 1;
for (int j = 0; j <= i; j++) {
rowIndex2 += dinerList.get(j).orderList.size();
}
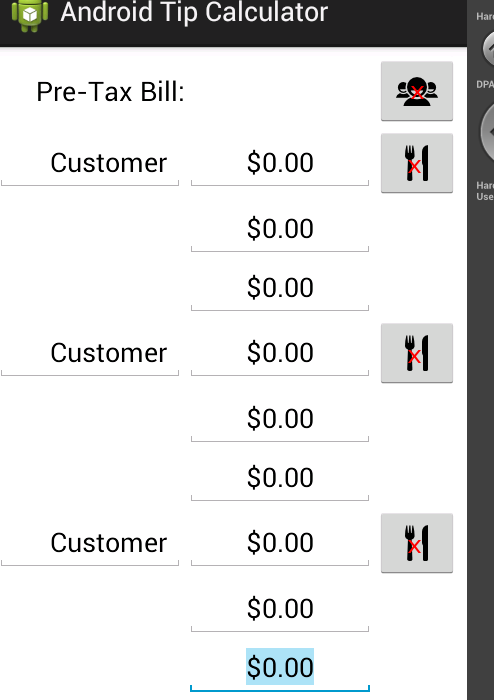
mainTable.addView(row3, rowIndex2);
//Add the order to the correct Diner's orderList.
dinerList.get(i).newOrder(newOrder);
}
}
}
}
//Implement the onFocusChange method of OnFocusChangeListener.
@Override
public void onFocusChange(View v, boolean hasFocus) {
//Use a for loop to run though all of dinerList, and if any one of their etName EditTexts lost focus, do this.
for (int i = 0; i < dinerList.size(); i++) {
if (v == dinerList.get(i).etName && hasFocus == false) {
//Set the tvName TextView using the Diner's setName method.
dinerList.get(i).setName();
}
}
}
}
package glaukon.tutorials.tipcalc;
//Import statements let us use code that's not in our project's package.
import java.util.ArrayList;
import android.widget.EditText;
import android.widget.ImageButton;
import android.widget.TextView;
public class Diner {
//Declare the variables we'll need.
public EditText etName;
public EditText etFirstOrder;
public ImageButton ibAddOrder;
public TextView tvName;
public TextView tvSplitBill;
public ArrayList<EditText> orderList;
//This is the constructor. It runs when you instantiate a Diner. It brings together all the Views that are associated with a new Diner object.
public Diner(EditText et1, EditText et2, ImageButton ib, TextView tv1, tv2) {
//We also need an ArrayList to keep track of each Diner's orders.
orderList = new ArrayList<EditText>();
etName = et1;
etFirstOrder = et2;
ibAddOrder = ib;
tvName = tv1;
tvSplitBill = tv2;
orderList.add(etFirstOrder);
}
//This method sets the Text property of tvName to whatever the user changed the Text property of etName to.
public void setName() {
//We need to use toString because getText does not return a string.
tvName.setText(etName.getText().toString());
}
//This method adds a new order to a Diner's orderList.
public void newOrder(EditText newOrder) {
orderList.add(newOrder);
}
}