Chapter 3: Java - Part 6
Right then, now that we have this organizational unit, what can we do with it? Well nothing yet. We're going to have to keep track of it first. Yup, we need something to keep track of the thing that keeps track of other things. Programming is just fun* like that. But yes, we do need something to keep track of all the Diner objects we make. And that thing is an ArrayList. An ArrayList is an object that keeps a bunch of similar objects organized in a list. Doing so lets you access some of the ArrayList's methods, which lets you do things like count how many objects are in the ArrayList. And that's super helpful. So let's import some ArrayList code:
import java.util.ArrayList;
Let's also declare an ArrayList variable called dinerList:
private ArrayList<Diner> dinerList;
Note that we have to say what kind of object the ArrayList to be referenced will hold using this notation: <Ojbect>. In this case, it holds Diners. It cannot hold anything that is not a Diner object. Any attempt to do so will make Java mad at us. Next, let's assign that variable to a new ArrayList we create:
dinerList = new ArrayList<Diner>();
Note that usually, we can declare and assign a variable in the same line. I avoid doing that here because ArrayLists are new, this is a novice level tutorial, and doing so makes code harder to read and understand (IMO; it's debatable).
Let's move on. Now, every time we create a Diner, let's add it to dinerList. Under the line where we created a new Diner object in the onClick method, add this line:
dinerList.add(diner);
The add method does exactly what you think it does. It adds the argument passed to it to an ArrayList. In this case, that's dinerList. Now, each time we create a new Diner, it gets put into an ArrayList of Diners. Yay! More organization! Trust me, this will all be useful soon.
Oh, and you probably noticed something. While we're creating a Diner and adding it to dinerList each time the user hits addDinerButton, what about our very first customer? The one that is there by default, as designed by our layout XML? Well that's a good point. We need to make a Diner object for that too, and add it to dinerList in the onCreate method. We already have access to the two EditTexts and two TextViews. We just need to get the first addOrder ImageButton into our code. Declare a variable:
private ImageButton addButton1;
Assign it:
addButton1 = (ImageButton) findViewById(R.id.addButton1);
And in the onCreate code block, let's use it and the other elements of the first customer to create the first Diner object of our app, and add it as the first element of dinerList. Make sure you add this underneath the other variable assignments. You can't use arguments that don't exist yet, after all.
Diner diner = new Diner(firstCustomer, amount1of1, addButton1, textSplit1, textSplit1Dollar);
dinerList.add(diner);
Great. So now that we have these organizational tools in place, we can start using them to fix that row-adding problem from way back. Remember that? And how, when we tried to add new rows to the bill splitting part of our app, the rows wouldn't go where we wanted? Ya, time to fix that. Replace the line where you add row2 to mainTable with the following:
mainTable.addView(row2, dinerList.size()*2 + 12);
The previous version of this line just added row2 to row number 14 in mainTable. This version adds row2 to a row number that is based on the size of dinerList. The size method returns a number that represents how many elements are in an ArrayList. So if there's only 1 Diner in dinerList, we will add the freshly created row2 to row number 1*2+12 = 14. However, if there are 2 Diners already, we will add the new row to row number 2*2+12 = 16. And if there are 3 Diners in our app, we add it to row number 18. And so on. Why do we multiply dinerList.size() by 2? Well, we want the new row2 to be the last row in the bill splitting portion of the app. Now, for every Diner already created, there are two new rows in mainTable. So to always get the last row in the bill splitting portion, we need to account for these extra rows that are created for each Diner. That is, there are 11 constant rows that will always be in mainTable before the last row of the bill splitting portion. There are also another 2 rows for every Diner we have (i.e. these rows vary based on the number of Diners). And then there is one more brand new row that is created before we get to row2 (the first row we add to mainTable in the onClick block). That's why the formula is the way it is. If it doesn't make sense right away, try thinking about it some more. And if that doesn't work, push on for now and come back to it with a fresh head tomorrow.
And now that we have this awesome way of adding rows, let's fix up the code that adds the first row. First, rename it to row1 to better distinguish it from row2, and change all occurrences of the row variable in our code to accommodate this change. Then replace the code that adds it to mainTable with this:
mainTable.addView(row1, dinerList.size()+1);
Before, we just added row1 to the 2nd row in mainTable. That was fine and all, but it would probably be more intuitive if we added new customers to the end of the list, instead of the beginning. See this infographic:
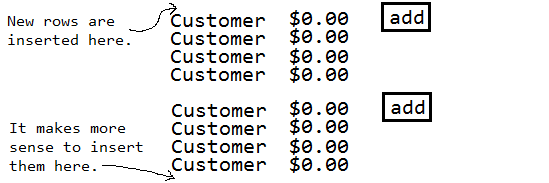
And that's what mainTable.addView(row1, dinerList.size()+1); does. I'll let you figure out how that exactly works, but it's very similar to how we add row2. Anyway, run our app in the AVD now, and you should get this:
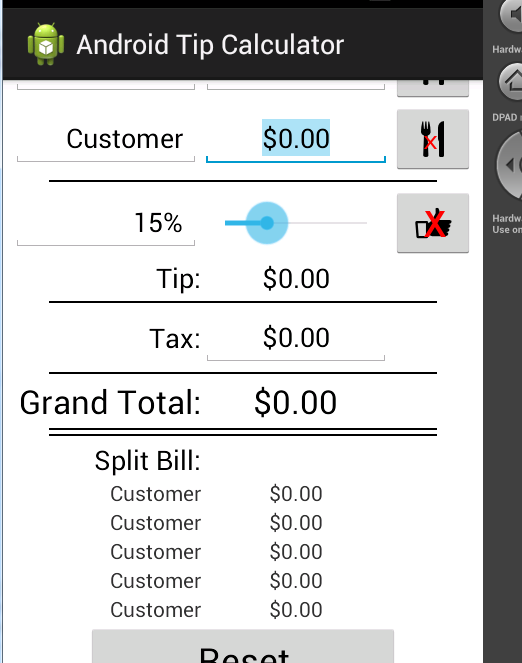
Beautiful. What did I tell you? Told you doing all that stuff with the Diner class and ArrayList was going to pay off. Maybe there were easier ways of fixing this, but now we have the tools to bring forth a variety of features. In fact, let's do that now.
Glossary
add(E element): The add method appends the argument it's passed to the end of the ArrayList it's called on.
ArrayList: An ArrayList is a way to keep a bunch of objects of the same type organized. You can put objects in an ArrayList, then use the various methods of ArrayLists to get information about this group of objects.
size(): The size method returns the number of elements in the ArrayList it's called on.