Chapter 2: User Interface - Part 5
Let's do the tip part of the app. Add a Number EditText to row 4. Set the Id to tipPercent, the Text to 15%, Select All On Focus to true, the layout gravity to center and the gravity to right|center_vertical.
Let's also add a SeekBar for the tip, in case the user prefers to input info that way. It also looks nifty as all hell. Find SeekBar in the Pallete window under Form Widgets. Drag it onto row 4. As you can see, a SeekBar is a slider widget. Sometimes, it can be a more useful method of input than just typing a number in, since it makes editing the input much more streamlined. Give the SeekBar an Id of tipSlider, and a layout gravity of center_vertical. Then find the Max property, and set it to 50. As expected, the Max property sets how high the SeekBar can go. 50% tip seems like the most anyone would ever normally give, so let's use that. Then, under Max, find the Progress property, and set it to 15. This will be what tipSlider starts at, since 15% is a very common tip.
We want people to have an option to round their tip. So let's add a button for that. Add an ImageButton to row 4, and give it a Src. Set the Id to roundButton, while you're at it. Also, we're eventually going to need another Src for this button. When the tip is rounded, we want to show one image, and when it's not rounded, we want to show a different image on the button. So go ahead and find two image resources for roundButton, even though we're only working with one right now.
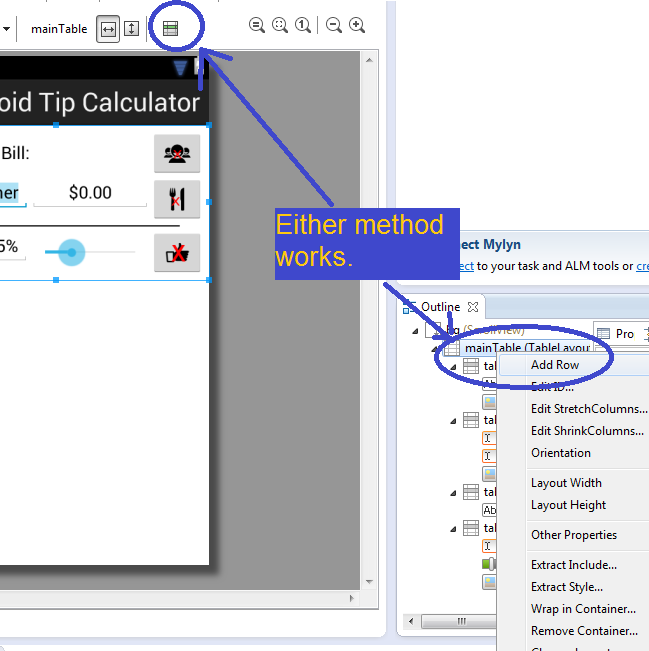
Near the start of this tutorial, when we made mainTable, Eclipse automagically generated 4 rows for us. We need to make some more for ourselves now. Right click mainTable in the Outline window, and click Add Row. Alternatively, select mainTable in the Outline window, and hit the Add Table Row button.
Add a Medium TextView to row 5. Set the layout gravity to right|center_vertical. At this point, you should notice that I usually don't bother setting gravity for TextViews since the View wrapper for TextViews wraps around the content very tightly, such that setting either layout gravity or gravity acheives very similar effects. Then set the Text to Tip:
Add another Medium TextView to row 5. Set the Id to tipDollar, the Text to $0.00, and the layout gravity to center.
Cool, we're done with the tip UI. Add another row, then put another black line in it, just like before. You can even copy and paste if you'd like. If you do, make sure there aren't any duplicate Ids.
Now let's work on the Tax section. From here on out, I'd like to focus on a more XML-favored perspective. We're already pretty good at using the Graphical Layout tab.
Add the following lines of code to the end of mainTable. Then we'll go over the important bits.
<TableRow
android:id="@+id/tableRow7"
android:layout_width="wrap_content"
android:layout_height="wrap_content" >
<TextView
android:id="@+id/textView5"
android:layout_width="wrap_content"
android:layout_height="wrap_content"
android:layout_gravity="right|center_vertical"
android:text="Tax:"
android:textAppearance="?android:attr/textAppearanceMedium" />
<EditText
android:id="@+id/taxDollar"
android:layout_width="wrap_content"
android:layout_height="wrap_content"
android:layout_gravity="center"
android:gravity="center"
android:inputType="numberDecimal"
android:nextFocusDown="@+id/amount1of1"
android:nextFocusRight="@+id/amount1of1"
android:selectAllOnFocus="true"
android:text="$0.00" />
</TableRow>
You should now be able to figure out that these lines of code create another row, and put a TextView and an EditText in them. The TextView is a medium-sized one that says Tax:, and has a layout gravity of right|center_vertical. The EditText is of the Number (Decimal) variety, and has an Id of taxDollar, a layout gravity of center, a gravity of center, Select All On Focus set to true, and a Text of $0.00. What you may not be so familiar with are nextFocusDown and nextFocusRight. On some Andorid phones, there is a directional pad used for navigation. Even those without a d-pad will usually at least have a Next button. When a user finishes editing one EditText, instead of having to click the next one, he can just hit the Next button, or one of the d-pad buttons, to jump to the next EditText. Android automagically determines what View is next, and what View is down, or to the right. However, we can change it if we want. In the above code, we made it so that when the user is editing taxDollar, and hits next, down, or right, he will jump up to amount1of1. Normally, Android would have sent the user to firstCustomer, since that would be the default next EditText in the app. Since most users won't be very interested in editing the names in this app, we force Android to bypass firstCustomer, for the users' convenience.
Glossary
SeekBar: A SeekBar is a very neat View object that looks like a horizontal slider that the user can manipulate. It's a cool way of getting input from a user if you just need, say, a number from him.