Chapter 2: User Interface - Part 4
Okay, go back to the XML tab. Add the following lines to the top of the ScrollView code block:
xmlns:android = "http://schemas.android.com/apk/res/android"
xmlns:tools = "http://schemas.android.com/tools"
It defines the XML
namespace. Essentially, a namespace tells Android what rules our document follows. Don't worry too much about what that means, just know that you should always add it to the top of the outermost code block of your XML file. Also, since we're here, give the ScrollView an Id of
bg.
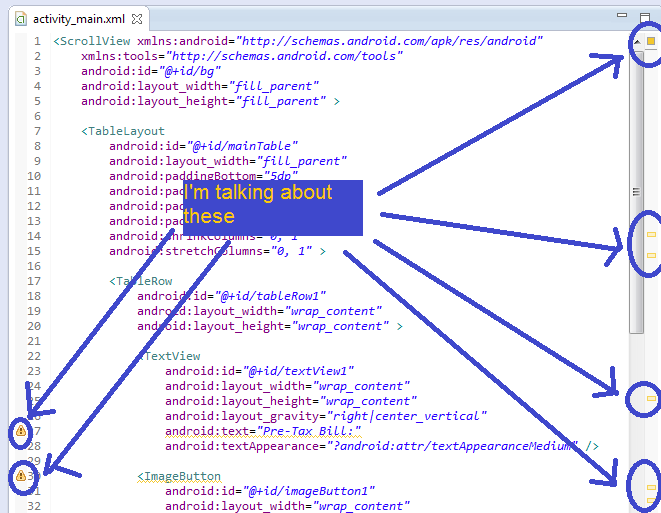
Okay, let's do a check to see if we're all on the same page. Your XML code should look like this:
<ScrollView xmlns:android = "http://schemas.android.com/apk/res/android"
xmlns:tools = "http://schemas.android.com/tools"
android:id="@+id/bg"
android:layout_width="fill_parent"
android:layout_height="fill_parent" >
<TableLayout
android:id="@+id/mainTable"
android:layout_width="fill_parent"
android:paddingTop = "5dp"
android:paddingLeft = "5dp"
android:paddingRight = "5dp"
android:paddingBottom = "5dp"
android:shrinkColumns = "0, 1"
android:stretchColumns = "0, 1">
<TableRow
android:id="@+id/tableRow1"
android:layout_width="wrap_content"
android:layout_height="wrap_content" >
<TextView
android:id="@+id/textView1"
android:layout_width="wrap_content"
android:layout_height="wrap_content"
android:layout_gravity="right|center_vertical"
android:text="Pre-Tax Bill:"
android:textAppearance="?android:attr/textAppearanceMedium" />
<ImageButton
android:id="@+id/addDinerButton"
android:layout_width="wrap_content"
android:layout_height="wrap_content"
android:src="@drawable/adddiner"
android:layout_column = "2"/>
</TableRow>
<TableRow
android:id="@+id/tableRow2"
android:layout_width="wrap_content"
android:layout_height="wrap_content" >
<EditText
android:id="@+id/firstCustomer"
android:layout_width="wrap_content"
android:layout_height="wrap_content"
android:layout_gravity="center"
android:ems="10"
android:gravity="right|center_vertical"
android:inputType="textPersonName"
android:selectAllOnFocus="true"
android:text="Customer" >
<requestFocus />
</EditText>
<EditText
android:id="@+id/amount1of1"
android:layout_width="wrap_content"
android:layout_height="wrap_content"
android:layout_gravity="center"
android:ems="10"
android:gravity="center"
android:inputType="numberDecimal"
android:selectAllOnFocus="true"
android:text="$0.00" />
<ImageButton
android:id="@+id/addButton1"
android:layout_width="wrap_content"
android:layout_height="wrap_content"
android:src="@drawable/additem" />
</TableRow>
<TableRow
android:id="@+id/tableRow3"
android:layout_width="wrap_content"
android:layout_height="wrap_content" >
</TableRow>
<TableRow
android:id="@+id/tableRow4"
android:layout_width="wrap_content"
android:layout_height="wrap_content" >
</TableRow>
</TableLayout>
</ScrollView>
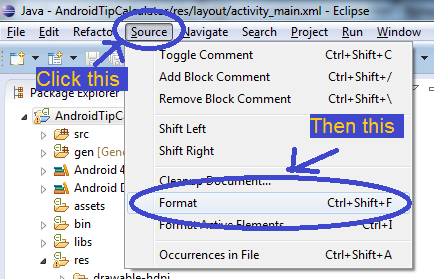
Well, maybe not exactly like that. Your version probably has indents. But let me show you something cool about Eclipse. Replace your indented code with my ugly code. Then go to Source at the top, then Format. Ta-da! Nice, formatted code, without any work. And of course, you can use the shortcut, which is Ctrl+Shift+F by default.
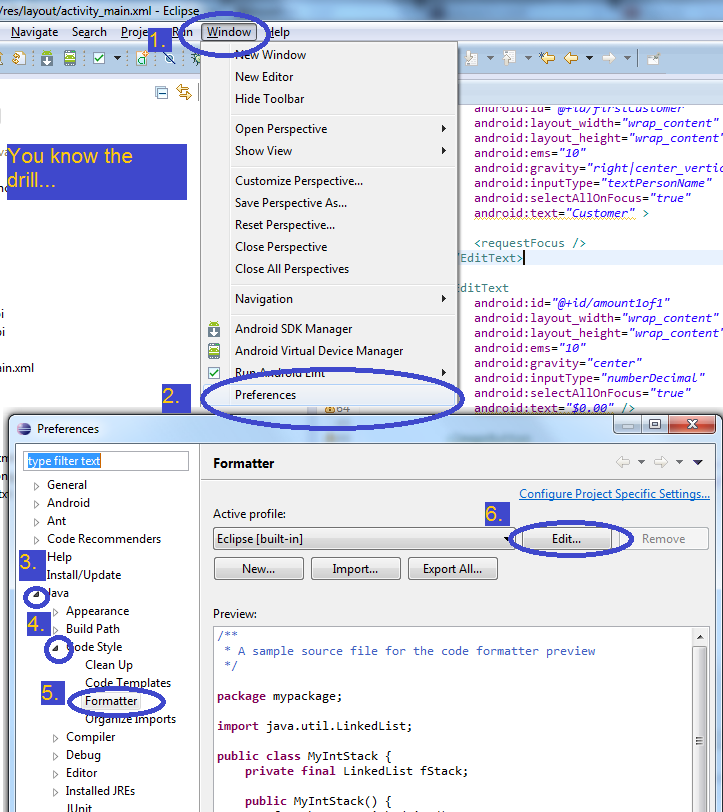
You can even configure the autoformatter to do what you want it to. Just go to Window, then Preferences, then click the triangle next to Java, then the triangle next to Code Style, then select Formatter, then hit the Edit... button.
And while we're messing with Eclispe's options, let's fix those annoying yellow warnings it keeps giving us.
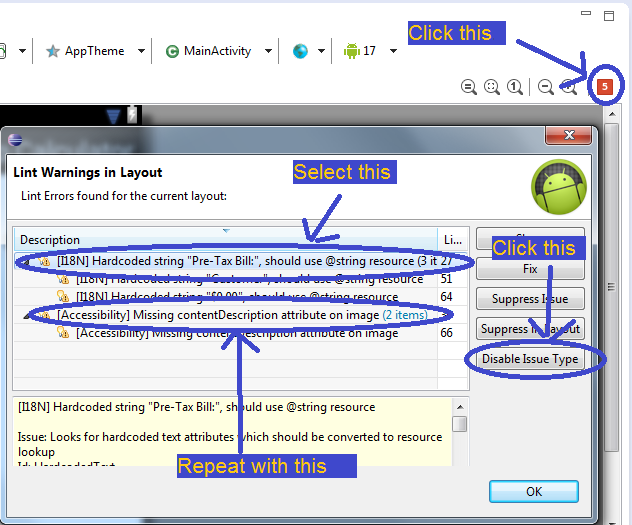
Go to the Graphical Layout tab. Click the red Lint square at the top-right corner of the preview window. Note that
lint is something that checks your code for both errors, and good programming practices. But with regard to programming practices, it's not always right (just usually), and should only be used as a guide. After you click it, select the warning about hardcoding strings, and click
Disable Issue Type. Then do the same for the contentDescription warning. Or don't. It's up to you if you want to abide by these rules. I just want you to know how to get rid of these warnings if you need to. If the warnings don't disappear right away, change a little bit of code, save, and you should be good.
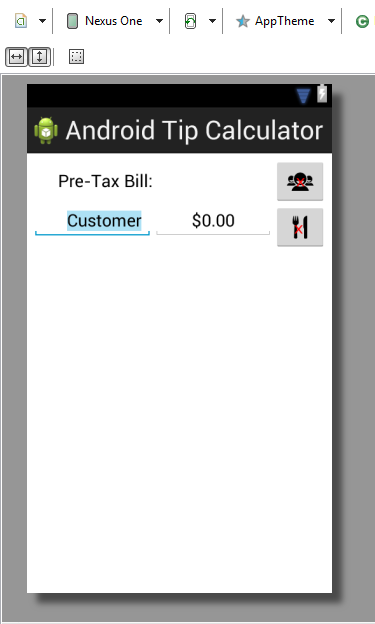
At this point, your Graphical Layout tab should look like this:
And yes, those buttons are supposed to have red crosses on them. It's because I don't own the rights to give the original images out for free. If you want to buy the images without the crosses, you can do so
here. Anyway, let's move on. I'm going to speed it up a little from here on out now that you've gotten a little bit familiar with Eclipse and Android.
Let's create a black line after what we have so far before we create the tip and tax part of the app. There's no straightforward way to do this in Android, so I'll show you a workaround. Add a TextView to row 3 of mainTable. Make the Text empty, and change the height to
1dp. We're still in the Graphical Layout tab. Scroll down to the
Background property, which is under View. Make the Background
#000, which is
hex for the colour black. Let's add a cushion of space between this line and the other views in our app. In the Properties window, under Layout Parameters, then under
Margins, find the
Top and
Bottom properties. Set them both to
3dp. Let's also add some space on the sides. Make the
Left and
Right margins
25dp.
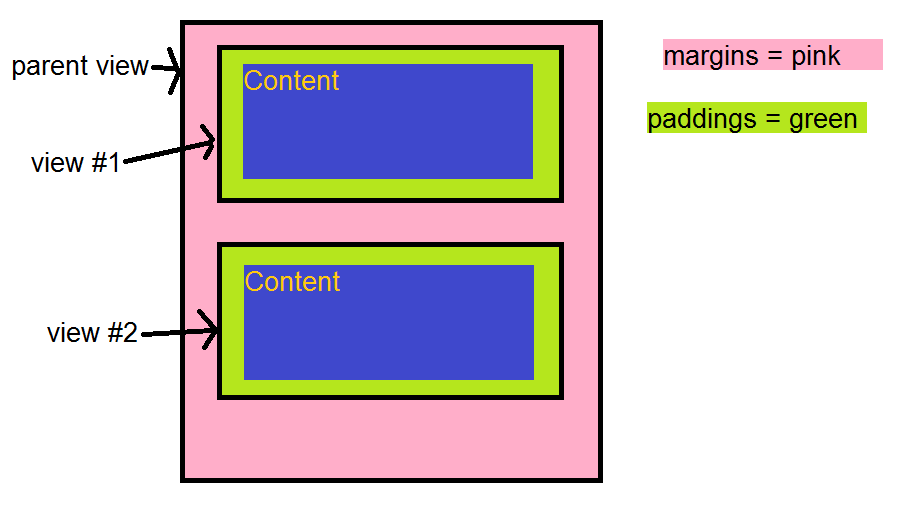
Before we continue, you may be wondering what the difference between
padding and
margins is. Basically, padding is the space within a View, between the content of the View and its border, and margins are the spaces between Views, that are outside their borders. Make sense? If not, here's an infographic.
Let's go over how we created the black line just now. We made a TextView, and set the Text to nothing. Then we made the background black, and the height 1 dp. So we now have a TextView that is all black (because there's no text on it), and with the smallest possible height. In other words, we have a line. Except, in this case, the height property is more like the width of the line. Then, we put some space around the line. Notice that if we used padding here instead of margins, it would not have worked, since the background color of black would have filled the padding space (only the content is affected by padding, and since there is no content, padding does nothing here).
Unfortunately, there remains one glaring issue. The line is very short. Too short. Let's fix that. We'll need to go into the XML for this one. Add the following line to the code block for the line.
The
span property dictates how many columns a particular View takes up in a table. Since our table has 3 columns, by setting the
span property to 3, the line now takes up the entire table, less the margins we set. Kind of sad it takes that much effort to make a black line, but nothing is perfect, and Android is no exception. Let's continue.
Glossary
Hexadecimal: Hexadecimal is a base-16 number system that has many uses, one of which is describing colors in programs and on the internet. Also, she's one of the main antogonists of the hit TV show
Reboot. Highly recommend.
Lint: Lint is the thing in Eclipse that highlights all the errors you make. And if you're me, it does a
lot of highlighting. It can catch bugs, as well as poor programming practices. It can also be a bit annoying at times, although fortunately, it's easy to change its settings in Eclipse.
Margins: Margins refer to the empty space between one View's borders and another View's borders. It's different from padding. You should check out my sweet infographic.
Namespace: Namespaces are used in programming to organize unique keywords to avoid conflict. Among other things, it makes it possible to use a library about geography and a library about astronomy that both have a functions called 'getDistance()' in the same project, without any conflict.
Padding: Padding refers to the empty space between a View's borders and its content. It's different from margins. You should check out my sweet infographic.
Span: The span property refers to how many columns a View in a TableLayout takes up. By default, Views only take up one column, but you can increase that.