Chapter 3: Java - Part 3
Now we're cookin'. Okay, we do have a problem though. The new rows are a little off. Among other things, both their gravities and layout gravities aren't quite right. And of course, we also need another EditText and an ImageButton for each new row. So let's take care of that now. Declare the following variables:
private EditText firstCustomer;
private EditText amount1of1;
And assign them as such:
firstCustomer = (EditText) findViewById(R.id.firstCustomer);
amount1of1 = (EditText) findViewById(R.id.amount1of1);
Great, now we have access to the EditTexts we made in the XML. We can then copy their layout information and apply it to our new rows. Make your addDinerButton onClick code look like this:
TableRow row = new TableRow(this);
EditText et1 = new EditText(this);
et1.setText("Customer");
et1.setSelectAllOnFocus(true);
et1.setGravity(firstCustomer.getGravity());
et1.setInputType(firstCustomer.getInputType());
et1.setLayoutParams(firstCustomer.getLayoutParams());
et1.setWidth(firstCustomer.getWidth());
EditText et2 = new EditText(this);
et2.setText("$0.00");
et2.setSelectAllOnFocus(true);
et2.setGravity(amount1of1.getGravity());
et2.setInputType(amount1of1.getInputType());
et2.setLayoutParams(amount1of1.getLayoutParams());
et2.setWidth(amount1of1.getWidth());
ImageButton ib = new ImageButton(this);
ib.setImageResource(R.drawable.additem);
row.addView(et1);
row.addView(et2);
row.addView(ib);
mainTable.addView(row, 2);
Quite the big change, I know. But I also know you're starting to get the hang of this Java business, so I feel confident I can go a little faster now without too much issue. Let's go over this, line by line. First, we create a TableRow. Then an EditText, et1. We set the Text property of et1. Then, we set et1's Select All On Focus property to true, so that the user selects all the text when he clicks on it. Next, we set et1's gravity using
setGravity. The value we pass to setGravity is firstCustomer's gravity value. We get firstCustomer's gravity value using the
getGravity method (make sure not to forget the
() at the end). Then we set the
Input Type property to the same as firstCustomer's. The Input Type refers to what kinds of characters the user can input: numbers, letters, symbols, etc. When you use certain types of EditTexts in the Graphical Layout tab, like the Person Name EditText, the Input Type is automagically set to the appropriate value to let the user input a person's name. As you can see, the methods used for Input Type are very similar to those used for gravity. After that, we set et1's
Layout Parameters to the same as firstCustomer's.
Layout Paremeters are things like height, width, and layout gravity (but not gravity). Again, the method names are very intuitive. Finally, we set the width of et1 to the same as firstCustomer (more on this in just a sec).
With that done, we move on to the next line, which has us create another EditText, et2. We do pretty much the same thing to et2 as we did with et1, except we are copying the properties of amount1of1 this time, instead of firstCustomer. We do have to set the Text property ourselves (instead of getting and setting) since that's something the user can change about firstCustomer, and we want it to be $0.00 each time he makes a new customer. Lastly, we make a new ImageButton, and set its Src to something in our drawable folders. Notice that we didn't bother with the layout properties here since the default ones are just fine for our purposes. If your image has different dimensions, you may need to tweak the properties a little here, which is something I'm sure you're capable of now. And if not, there's no better teacher than Google. Notice also that we didn't simply copy over the Src from addButton1 in our XML. This is because, as far as I know, there isn't a handy getImageResource sort of method available. I don't know why, nor, to be honest, am I likely smart enough to understand why if someone explained it. Oh well.
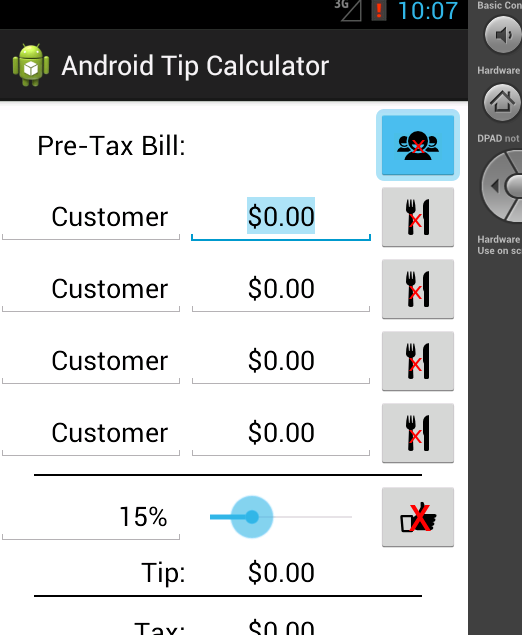
After all that, we add everything to the TableRow, then add the TableRow to mainTable. Cool cats, let's see what we have now:
Oh, and if you were wondering why we had to specifically set the width on our EditTexts, even though we supposedly copied them over already by copying the Layout Parameters, it's because of the quirky way Layout Parameters work with stretching and shrinking TableLayouts. Try taking out the lines where we set the widths and running the resulting code in an AVD. It looks weird. So ya, just something we have to deal with. Not ideal, and it bloats our code, but I can't think of a better way to fix it.
Anywho, our app is making some good progress now. If you need more info about any of the methods we just used, you can see the glossary entries for
setText,
setSelectAllOnFocus,
setGravity,
getGravity,
setInputType,
getInputType,
setLayoutParams,
getLayoutParams,
setWidth,
getWidth. Although they're all pretty self-explanatory.
Glossary
getGravity(): The getGravity method returns the gravity of the View it's called on.
getInputType(): The getInputType method returns the kind of characters a View accepts.
getLayoutParams(): The getLayoutParams method returns the Layout Parameter properties of a View.
getWidth(): The getWidth method returns the Width property of a View.
Layout Parameters: Layout Parameters are the properties of a View that dictate how it appears in your app, like height, width, layout gravity, etc.
setGravity(): The setGravity method sets the gravity of the View it's called on.
setInputType(): The setInputType method sets what kind of characters a View accepts.
setLayoutParams(): The setLayoutParams method sets the Layout Parameter properties of a View.
setSelectAllOnFocus(): The setSelectAllOnFocus method sets whether or not a View will select all of its text when it gains focus.
setText(): The setText method sets the Text property for Views like TextViews and EditTexts.
setWidth(): The setWidth method sets the Width property of a View.