Chapter 3: Java - Part 2
Alrighty, let's start actually writing our own code now. Finally, right? Okay, the first thing we want to do is make the addDinerButton work. That button is the one the user clicks on in order to add another row to mainTable so that he can input his buddy's info. In order to manipulate mainTable in our code, we need to reference its Id that we set in the XML. Add this line above the onCreate code block:
private TableLayout mainTable;
At this point, Eclipse is probably telling you it doesn't know what a TableLayout is. Go ahead and import the part of the Android library that deals with TableLayouts by putting this line with the rest of your import statements.
import android.widget.TableLayout;
Ok, so the earlier line declares a variable. A variable is just a thing that references an object, like a TableLayout. When we want to manipulate that object, we can use the reference variable to refer to it. For beginners, it may be best just to think of variables as the object itself, although that technically isn't quite accurate. Anyway, the line says to declare (essentially, 'create') a variable called mainTable (you don't have to use the same name as the Id, I just like to), and the type of object it's going to refer to is a TableLayout object. Since we specified the type, if we later try to make the mainTable variable refer to something that is not a TableLayout, Java won't let us. Also, this variable is private, so other classes can't mess with it, but don't worry about that. And if you're wondering, yes, we just gave MainActivity its first unique attribute that sets it apart from other Activities: a TableLayout.
Next, add the following line to the onCreate code block, under setContentView:
mainTable = (TableLayout)findViewById(R.id.mainTable);
The = sign is used to set what a variable is referencing, also called assigning it a value. Earlier, our variable was just declared. We didn't tell the computer what it was referencing yet. Here, we do. findViewById is a method we inherited from Activity. It takes an Id as an argument, and returns the object with that Id. That is, when we pass the argument R.id.mainTable, findViewByIdfinds the object with the Id of mainTable, and returns, or tells it to us. So the whole line basically says: make the variable mainTable reference the object that has an Id of mainTable. One thing to note is the (TableLayout) in front of findViewById. The thing is, findViewById only ever returns a View object. Now, technically, our mainTable is a View object, since TableLayouts inherit from Views. But we don't want just the plain old View version, we want the TableLayout version of mainTable. Otherwise, we wouldn't have access to mainTable's TableLayout features, like rows, columns, and the like. So, by putting (TableLayout) in front of the method, we're telling findViewById to return only the TableLayout version of mainTable, rather than the regular View version. This is called casting mainTable as a TableLayout. And again, don't worry too much about the R.id part, it's just Eclipse doing its magic.
Great, now we have access to mainTable in our Java code. Any time we want to manipulate mainTable, we can use the variable mainTable. Let's do the same thing for addDinerButton so that we can manipulate that as well. Add the following to the import statements so that we can work with ImageButtons:
import android.widget.ImageButton;
Then add this under the line where we declared mainTable:
private ImageButton addDinerButton;
Then add this under the line where we set the reference for mainTable:
addDinerButton = (ImageButton)findViewById(R.id.addDinerButton);
It should be obvious what we just did. We imported what we needed, then declared a private variable called addDinerButton that will refer to an ImageButton, then assigned that variable a value that refers to the object with an Id of addDinerButton. Coolio, now we can access addDinerButton in our Java code too. Ok, next.
For buttons to work, our MainActivity needs to be able to register, or 'listen' to, button clicks from the user. Activities do not, by default, have the ability to listen to user input. The easiest way to give our MainActivity the power to hear button clicks is to let it inherit that power (i.e. that method) from another class (or at least a class-y thing - you'll see what I mean soon). Unfortunately, we are only allowed to extend one class in Java. Luckily, we can inherit methods using another concept: interfaces. While classes in Java can only extend one class each, they can implement an unlimited number of interfaces.
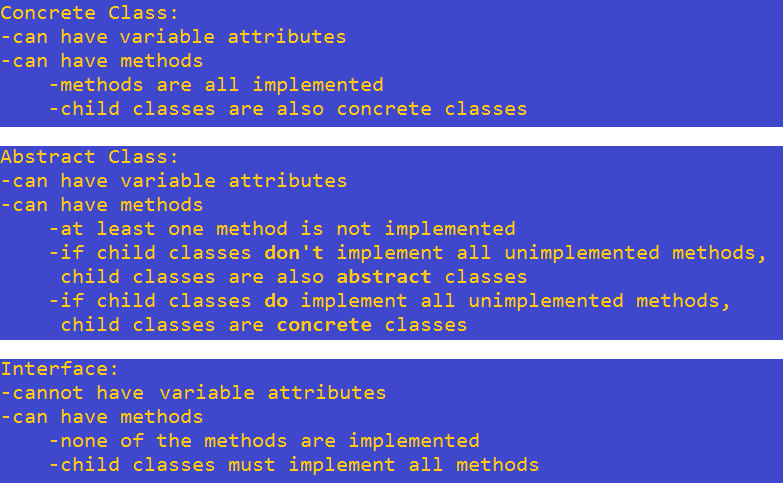
Right then, let's back up. There are, from a very simplistic perspective, 3 main class-y, or class-like things in Java that help us organize and structure our programs. There is the concrete class. A concrete class has default definitions for all its methods. Now, when you inherit from a concrete class, you can use the methods as is, or you can override some or all of them. The Activity class is concrete. Then there's the abstract class. An abstract class has at least one method without a default definition. We say that it has not implemented that method yet. When you inherit from an abstract class, you can implement that unimplemented method if you want (i.e define it), but you don't have to. If you don't though, then the class that inherited from the abstract class also becomes an abstract class itself. Abstract classes cannot be instantiated. And finally, there's the interface. An interface has no implemented methods. All it's methods are unimplemented. Unlike the other two class-y things, you can inherit from an unlimited amount of interfaces. Also, if you decide to inherit from an interface, you must implement all its methods. You can't leave any of them unimplemented in the class that inherits from it. That's just the rule. Oh, and interfaces don't have any variable attributes, but the other two do. Here's a cheat sheet.
As an aside, if you're curious, yes, you could conceivably have an abstract class that only has unimplemented methods and has no attributes, and thus would be the same thing as an interface. But that's silly, because it's better to make it an interface if you're going to do that, since you can implement an unlimited amount of interfaces.
So what is an interface, really? Well, here's one very simplistic (albeit somewhat incorrect) way of thinking about it, which will suffice for now: while classes describe what we are, interfaces describe what we can, and indeed, must, do. They're kind of like jobs. A little bit. Ok, here's another infographic to summarize all we know about OOP so far.
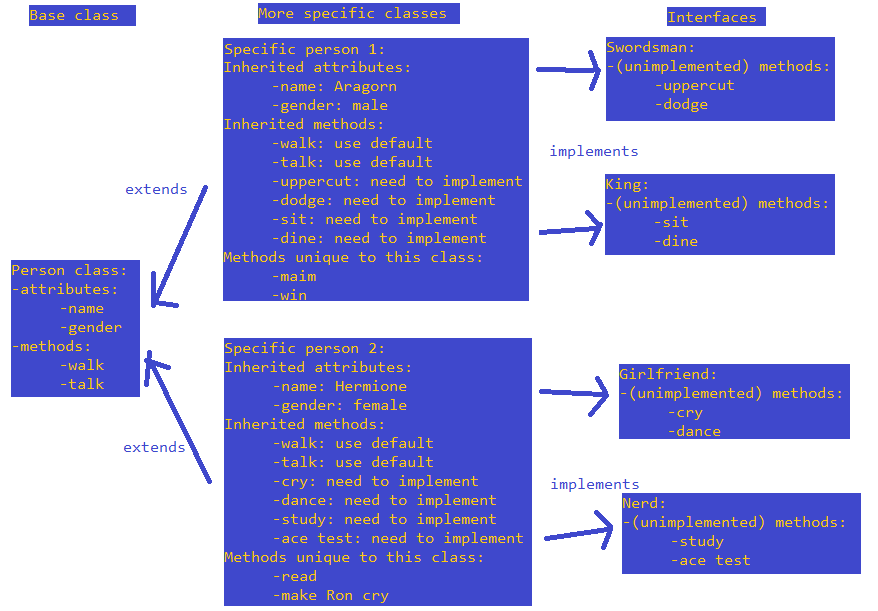
So we extend classes that describe what we are, and we implement interfaces that describe what we want to do. Now, we want MainActivity to be able to listen to user clicks. We need to implement an interface that can hear the clicks. That something is the OnClickListener interface. Make your MainActivity line look like this:
public class MainActivity extends Activity implements OnClickListener {
Again, the key word implements basically, kind of, sort of means 'inherits from'. Now Eclispe is probably complaining about how it doesn't know what OnClickListener is. Add this to the list of import statements you already have:
import android.view.View.OnClickListener;
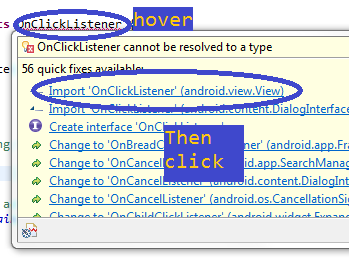
By the way, you could have also just hovered over the word OnClickListener and Eclipse would have given you the option of having it automatically write the import statement in a pop-up.
Right then, OnClickListener is an interface that contains a method called onClick. Of course, onClick is unimplemented. So, let's implement it now. Either hover over the word MainActivity and have Eclipse write the following code for you, or write the code yourself underneath the onCreateOptionsMenu code block.
@Override
public void onClick(View v) {
// TODO Auto-generated method stub
}
You can delete the comment Eclipse made for you if you want. As you can see, even though we're just implementing an unimplemented method, we still use the @Override keyword. onClick is the only method the OnClickListener interface has. Just like the computer runs, or 'calls', the onCreate method when an Activity is created, the computer calls this method whenever the user clicks something that OnClickListener is listening to (more on that in a second). Since we implemented this method, now, every time the user clicks on something that we're listening to, our MainActivity is able to hear it, and responds to the click by running the code inside onClick. Of course, right now, there is no code there, so nothing happens. We'll change that soon.
In order to get MainActivity (which, remember, implements OnClickListener) to listen to the addDinerButton, add the following line under the line where we set the reference for addDinerButton.
addDinerButton.setListener(this);
What this tells the computer to do is to make this listen to addDinerButton. The keyword this refers to the class that the current line of code belongs to. Since we're in the MainActivity class, this refers to MainActivity. So, we're telling MainActivity to listen to addDinerButton. Awesome. Now when we click addDinerButton, MainActivity will run the code in the onClick method. Let's work on that method now.
First, please note that onClick does have an argument that needs to be passed to it: View v. The first word, View, refers to the type of argument we need to pass to onClick. In this case, we need to pass a View object (remember those?). The second word, v, is simply the variable that will represent the View we pass in the onClick code block. That is, whenever we see v in the code block of onClick, it stands for the View we passed.
So, when a user clicks something like a button, Android calls the onClick method, and also automatically passes the button as the argument for it. Thus, we don't actually have to pass anything to onClick ourselves, Android does it for us. And again, what it does is pass, as an argument, whatever was clicked. Okay, cool, now make your onClick code block look like this:
@Override
public void onClick(View v) {
if (v == addDinerButton) {
TableRow row = new TableRow(this);
EditText et1 = new EditText(this);
et1.setText("Customer");
row.addView(et1);
mainTable.addView(row, 2);
}
}
While you're at it, go ahead and import what's necessary too:
import android.widget.EditText;
import android.widget.TableRow;
As always, you can copy and paste my code into Eclipse and have it autoformat it. So what did we make onClick do? First, we have a conditional, denoted by the keyword if. What that means is that the computer looks at what's in the round brackets after if, and if what's inside that is true, then the computer will run the code inside the if block, as marked by the fancy brackets. If it is not true, the computer will skip all the lines in the if code block, and jump right to the next line after that. In that case, since all we have in there is an if code block, the computer will actually reach the end of the entire onClick block, and do nothing for that click.
So what are we checking with if? We're checking if v == addDinerButton. The == sign, unlike the = sign, asks whether or not the thing to the left of it is the same, or equal to, the thing to the right of it. So here, we are checking if the argument Android passed, denoted as simply v, is equal to addDinerButton. (To be technical, it's checking if both are referencing the same object, since neither are really objects themselves (they're variables)). If the argument Android passed (that is, the thing that was clicked) is indeed addDinerButton, then the computer should run the code in the if block.
The first line in the if block declares a variable called row that will reference a TableRow object. In the same line, it says to make the variable reference a new TableRow. That's right, we can declare and set a reference on the same line. The new here tells the computer to make a brand new TableRow (rather than use a TableRow that already exists). The argument that TableRow gets passed is this. Again, this refers to MainActivity. Android wants us to pass an argument that tells it where we want the TableRow to be created. That is, Android wants to know the context of the TableRow.
In the next line, we do the same except we create an EditText, called et1.
After that, we set et1's Text property to "Customer" using the setText method. Note the syntax here, and the use of dot notation. We have the object, then a dot, then the object's method we want to use. Also, note the fact that the word Customer has quotes around it. This is because the setText method only accepts a string as an argument. In programming, a string refers to a string of characters, like a word. Strings always need to have quotes around them, to mark them as strings.
In the next line, we use the addView method to at et1 to row. This is the equivalent of dragging and dropping et1 onto row in the Graphical Layout tab when we were doing the UI. After that, we use addView again to add row to mainTable. Note that this time, we pass 2 arguments. Yes, methods can use more than one argument, and yes, sometimes some arguments are only optional, and if you don't pass any, like when we added et1 to row, a default value is used. The second argument is 2. It refers to what position we want to add row into mainTable at. By default, we add it in as the very first item (i.e. the default value that is passed is 0). However, we need the row to be added in the third line. The number 2 refers to the third line (0 is the first one).
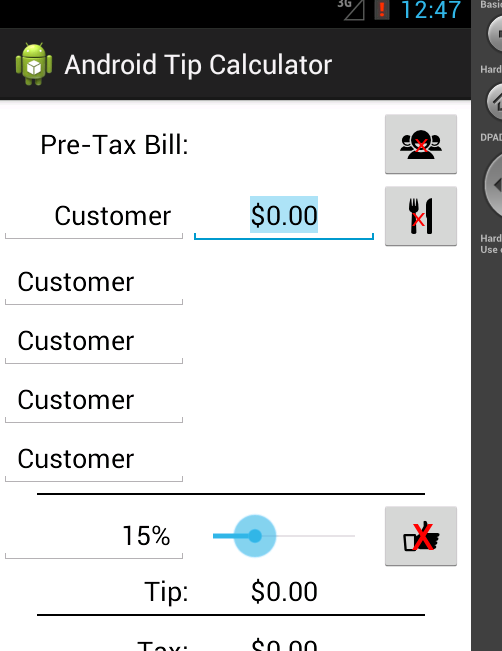
And that's it. That's the end of the if block, as well as the onClick block. Let's re-cap. Our MainActivity implements the interface OnClickListener. We then make MainActivity use the powers of OnClickListener to listen to addDinerButton. Then, when the user clicks addDinerButton, MainActivity runs the code inside of onClick. The code inside of onClick first checks if the thing that was clicked is addDinerButton. If not, the computer jumps to the end of the if block, and basically does nothing. If it is, then we make a TableRow and EditText, and give them variables. After that, we set the EditText's Text property, then add it as the first child of the TableRow. And then we add the TableRow as the third child of mainTable. Let's test. Run your app on an AVD or a real phone, then start hitting addDinerButton. You should see this:
Glossary
=: The = operator is used to assign a variable to reference some value. Not to be confused with ==.
==: The == operator is used to check if two things are equal to each other. Not to be confused with =.
Abstract Class: An abstract class is a class that has at least 1 unimplemented method.
addView(View child, [int index]): The addView method adds the argument it's passed to the View it's called on as a child. It has a second, optional argument, that can be used to specify at what position to add the child.
Assign: To assign a variable to an object means to make that variable reference that object.
Call: Calling a method is like saying 'using' a method.
Cast: Casting an object means to use a different version of an object. For isntance, if class A inherits from class B, objects instantiated from class A can be both of type A, and type B. Casting allows you to specify which version of that object you want to deal with.
Concrete Class: An concrete class is a class that has all its methods implemented, and can be instantiated to create an object.
Conditional: A conditional is a condition that is either passed or failed. The result of that check determines what happens next. The if-else construct is a common example of a conditional.
Context: The context of a View can be described as the environment a View is in. Among other things, it is used as an argument when you're creating new Views and setting up listeners.
Dot Notation: Dot notation refers to a particular way of writing object-oriented code. It uses dots to access an object's attributes and methods.
findViewById(int id): The findViewById method returns the object with an Id of whatever was passed as the argument.
if: The if conditional is a very common conditional. The code inside an if block only runs if the if conditional resolves to true. If not, the code is skipped. Sometimes, there is also an 'else' block under the if block. In these cases, the else block runs whenever the if conditional resolves to false.
Implement: Implement can mean 2 different things. It's the keyword used to mean 'inherits from' when dealing with interfaces. It also means to define a method when you inherit from another class.
Interface: Interfaces are things in Java that classes can inherit an unlimited amount of. Some examples include onClickListener and onFocusChangeListener.
new: The new keyword is used when instantiating an object that does not exist yet.
onClick(View v): The onClick method is called whenever something that onClickListener is listening to is clicked.
OnClickListener: The OnClickListener interface allows classes that implement it to listen to things that can be clicked on.
String: A string is a common data type in programming. It is a sequence of characters. In many programming languages, quotations are used to mark a string. "For instance, this sentence would be a string in Java."
this: The this keyword refers to the current object whose method or constructor is being called.
Type: Types are categories of objects and data, like string, integer, View, Activity, etc.
Variable: A variable is something that references an object.